
Microsoft Unity in ASP.NET MVC

Applying dependency injection and inversion of control in ASP.NET MVC with Microsoft Unity
Introduction
One way for decoupling classes is using Unity. You can learn more about Unity here. In this article, I will try to describe the usage of Unity. For doing that, you should follow the steps below.
Using Code
- Create a new project in Visual Studio (Visual Studio 2012 recommended)
- In File menu, click New -> Project.
- In New Project window, select Visual C# -> Web and then select ASP.NET MVC 4 Web Application. Figure a-1.
- Name the project (e.g.
TestUnity). - Click OK button.
- In New ASP.NET MVC 4 Project window, select Internet Application and Razor View engine (creating unit test project is optional ). Figure a-2.
- Click OK button.
- Installing Microsoft Unity
- In solution explorer window, right click on References folder.
- Click Manage NuGet Packages (don’t forget you have to connect to the internet).
- In left panel of Manage NuGet Packages window, select Online.
- In Search box placed in right panel of Manage NuGet Packages window, type unity3.
- In list of search result, select Unity bootstrapper for ASP.NET MVC and click install (click Accept button if it wants). After some moments, Unity will be installing. Figure b-1.
- Click close button to close Manage NuGet Packages window.
- Create a class in Models folder named
Personas follows:- Right click on Models folder and select Add -> Class
- Name the class Person.cs
- Type the below code into
Personclass:
- Create
WSCDBProviderclass into Models folder as follows:- Right click on Models folder and select Add->Class
- Name the class WSCDBProvider.cs
- Type the following code into WSCDBProvider.cs class
- Create an interface in Models folder named
IPersonRepository:- Right click on Models folder and select Add -> Class
- In items list, select Interface and named it IPersonRepository.cs
- Click Add button
- Type the following code into
IPersonRepositoryinterface:
- Create a class in Models folder named
PersonRepositoryas follows:- Right click on Models folder and select Add -> Class
- Name the class PersonRepository.cs
- Type the following code into class:
- Creating Person Controller:
- Right click on Controller folder and select Add -> Controller
- In Add Controller window, name controller
PersonController - For Scaffolding options, select MVC controller with empty read/write actions
- Click Add button. Figure g-1.
- Change the controller code as shown below:
- Now you should use Unity for injecting repository into Controller.
- Open UnityConfig.cs class from App_Start folder
- Type injecting command in
RegisterTypesmethod as shown below:
- Now your project is ready for creating Views and Run and Use.
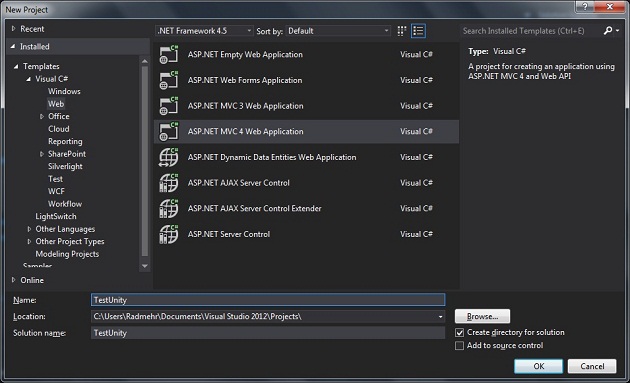
Figure a-1: Create a new project in Microsoft Visual Studio 2012.

Figure a-2: Select Internet Application and Razor view engine.
After step A, your project has been created and is ready for programming. Now you should install Unity as below (step B).

Figure b-1: Install Unity bootstrapper for ASP.NET MVC.
Unity will add two classes into App_Start folder (UnityConfig.cs, UnityMvcActivator.cs).
C#
Copy Code
using System;
using System.Collections.Generic;
using System.Linq;
using System.Web;

using System.Data.Entity;
using System.ComponentModel.DataAnnotations;

namespace TestUnity.Models
{
    public class Person
    {
        [ScaffoldColumn(false)]
        public int Id { get; set; }

        [Required]
        public string Name { get; set; }

        public int Age { get; set; }

        [Display(Name = "Contact Information")]
        public string ContactInfo { get; set; }
    }
}
C#
Copy Code
using System;
using System.Collections.Generic;
using System.Linq;
using System.Web;

using System.Data.Entity;

namespace TestUnity.Models
{
    public class WSCDBProvider : DbContext
    {
        public DbSet<person> Persons { get; set; }
    }
}
C#
Copy Code
using System;
using System.Collections.Generic;
using System.Linq;
using System.Text;
using System.Threading.Tasks;

using TestUnity.Models;

namespace TestUnity.Models
{
    public interface IPersonRepository : IDisposable
    {
        IEnumerable<person> GetAll();
        void InsertorUpdate(Person contact);
        Person Find(int id);
        bool Delete(int id);
        void Save();
    }
}
C#
Shrink ▲ Copy Code
using System;
using System.Collections.Generic;
using System.Linq;
using System.Web;

using System.Data;

namespace TestUnity.Models
{
    public class PersonRepository : IPersonRepository
    {
        private WSCDBProvider db = new WSCDBProvider();

        public IEnumerable<person> GetAll()
        {
            return db.Persons.ToList();
        }

        public Person Find(int id)
        {
            return db.Persons.Find(id);
        }

        public bool Delete(int id)
        {
            try
            {
                Person person = Find(id);
                db.Persons.Remove(person);
                Save();
                return true;
            }
            catch (Exception)
            {
                return false;
            }
        }

        public void InsertorUpdate(Person person)
        {
            if (person.Id == default(int))
            {
                // New entity
                db.Persons.Add(person);
            }
            else
            {
                // Existing entity
                db.Entry(person).State = EntityState.Modified;
            }
        }

        public void Save()
        {
            db.SaveChanges();
        }

        public void Dispose()
        {
            db.Dispose();
        }

    }
}

Figure g-1 : Add Controller
C#
Shrink ▲ Copy Code
using System;
using System.Collections.Generic;
using System.Linq;
using System.Web;
using System.Web.Mvc;

using TestUnity.Models;

namespace TestUnity.Controllers
{
    public class PersonController : Controller
    {
        private readonly IPersonRepository repository;

        public PersonController(IPersonRepository repository)
        {
            this.repository = repository;
        }

        public ActionResult Index()
        {
            var persons = repository.GetAll();
            return View(persons);
        }

        public ActionResult Details(int id)
        {
            var person = repository.Find(id);
            return View(person);
        }

        public ActionResult Create()
        {
            return View();
        }

        [HttpPost]
        public ActionResult Create(Person person)
        {
            try
            {
                repository.InsertorUpdate(person);
                repository.Save();
                return RedirectToAction("Index");
            }
            catch
            {
                return View();
            }
        }

        public ActionResult Edit(int id)
        {
            var person = repository.Find(id);
            return View(person);
        }

        [HttpPost]
        public ActionResult Edit(int id, Person model)
        {
            try
            {
                var person = repository.Find(id);
                repository.InsertorUpdate(person);
                repository.Save();
                return RedirectToAction("Index");
            }
            catch
            {
                return View();
            }
        }

        public ActionResult Delete(int id)
        {
            var person = repository.Find(id);
            return View(person);
        }

        [HttpPost, ActionName("Delete")]
        public ActionResult DeleteConfirmed(int id)
        {
            bool ret = repository.Delete(id);
            if(ret)
                return RedirectToAction("Index");
            return View();
        }

        protected override void Dispose(bool disposing)
        {
            if (disposing)
            {
                repository.Dispose();
            }
            base.Dispose(disposing);
        }
    }
}
C#
Copy Code
container.RegisterType<IPersonRepository, PersonRepository>();

Figure h-1 : UnityConfig.cs class
Post a Comment
hi